
Basement Renovation Step by Step Process: Materials and To-Do's
Trae Rick
6/25/20262 min read

From Concrete to Comfortable: The Step-by-Step Process of Finishing a Basement
A finished basement can add valuable living space, increase home value, and create a comfortable area for entertainment, work, or relaxation. Starting with bare concrete walls and floors may seem overwhelming, but following a structured process makes the transformation straightforward. Here's how a basement goes from unfinished to fully completed.
1. Electrical
The first step is installing the electrical system. Before walls are built, electricians run wiring for outlets, switches, lighting, smoke detectors, entertainment systems, and any future appliances. Planning is critical during this stage because it determines how the finished space will function.
Materials Needed For This Stage: Romex, Can Light Boxes, Can Lights, Light Switch Boxes, Switch Covers, Nail Staples, Drill
2. Framing and Drywall
With the electrical work complete, framing begins. Wood studs are installed to create walls, define rooms, and provide support for drywall. This stage turns an open basement into a functional layout with bedrooms, offices, storage areas, or entertainment spaces.
After framing is complete, drywall is hung, taped, and finished. Multiple coats of joint compound are applied and sanded smooth to create seamless walls and ceilings. Once finished, the basement starts to look like a true living space rather than a construction project.
Materials Needed For This Stage: Lumber, Drywall, Wood Screws, Joint Compound, Drywall Tape, Ramset, Ramset Nails, Drill
3. Painting
Painting is where the basement really comes to life. The walls and ceilings are primed and painted to create a clean, finished appearance. Choosing lighter colors can help brighten basement spaces that receive limited natural light.
Once the walls and ceilings are complete, trim and doors are painted or stained. This final touch adds contrast, character, and a polished look throughout the basement.
Materials Needed For This Stage: Ceiling Paint, Trim Paint, Wall Paint, Brushes, Paint Roller, Paint Tray
4. Flooring
The final major step is preparing and finishing the floor. A vapor barrier is installed over the concrete slab to help protect against moisture migration from the ground below. This layer helps improve comfort and can extend the life of the finished flooring.
Once the vapor barrier is in place, the flooring is installed. Whether it's luxury vinyl plank, laminate, engineered hardwood, carpet, or tile, the finished floor completes the transformation. Baseboards and final trim details are then added, bringing the entire project together.
Materials Needed For This Stage: Vapor Barrier, Flooring, Baseboard, Quarter Round, Brad Nails, Loctite Power Grab, Caulk, Nail Gun, Mallet, Floor Spacers, Nail Hole Patch
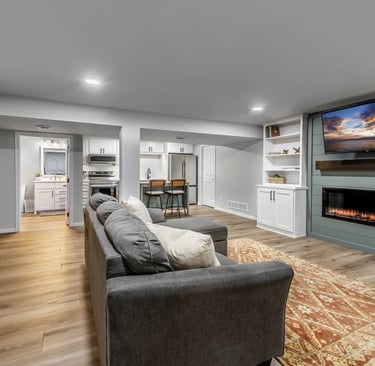
The Finished Result
By following these four key steps—electrical, framing and drywall, painting, and vapor barrier with flooring—a bare concrete basement can be transformed into a beautiful, functional extension of the home that your family can enjoy for years to come.